
6 Best Pool Heater Replacement Parts for DIY Repairs
Extend your pool heater’s lifespan with these 6 essential DIY replacement parts. Learn which components ensure efficient heating and save on repair costs.
There is nothing quite like the disappointment of walking out to your pool on a chilly morning, only to find the water temperature has plummeted due to a faulty heater. While professional repairs can be costly, many common issues are well within the reach of a capable DIY enthusiast with the right parts. This guide will walk you through the essential components you need to get your system back to peak performance without breaking the bank.
Disclosure: As an Amazon Associate, this site earns from qualifying purchases. Thank you!
Essential Diagnostic Steps for Pool Heaters
Before you start ordering parts, you must isolate the actual culprit behind your heater’s failure. Most modern heaters feature digital diagnostic displays that output error codes; always cross-reference these codes with your specific owner’s manual before turning a single wrench.
Start by checking the basics: ensure your pool pump is running, the filter is clean, and there is adequate water flow. Many heaters have a "flow switch" that prevents the burner from igniting if it senses insufficient water movement, which is often mistaken for a major mechanical failure.
If the heater has power but won’t fire, inspect the wiring for signs of corrosion or loose connections. A simple multimeter can help you verify if the heater is receiving the correct voltage. Ruling out these simple electrical and flow issues saves you from replacing expensive components that aren’t actually broken.
Hayward H-Series Control Board Replacement

The control board is the brain of your Hayward H-Series heater, and when it fails, the entire unit usually goes dark or unresponsive. If your display is flickering, showing garbled text, or failing to register temperature setpoints, this board is likely your primary suspect.
Heat your pool or spa efficiently with the Hayward Universal H-Series 250,000 BTU Natural Gas Heater. Its cupro nickel heat exchanger resists corrosion, while the hydraulic design saves energy by reducing pump run time.

I recommend this specific OEM (Original Equipment Manufacturer) replacement for anyone dealing with erratic system behavior. It is a plug-and-play solution that eliminates the guesswork of troubleshooting individual micro-components on the circuit board.
This part is perfect if you are comfortable with basic electrical safety but want to avoid the complexity of board-level soldering. If your heater is more than five years old and showing signs of "ghost" errors, replacing the board is the most efficient way to restore reliability.
Pentair MasterTemp Ignition Control Module
When your Pentair MasterTemp starts clicking but never produces a flame, the ignition control module is often the source of the frustration. This component is responsible for the critical spark that lights the pilot or burner, and it is prone to wear over time due to the intense heat environment.
This module is a must-have for owners who have already verified that their gas supply is active and their flame sensor is clean. It’s a robust, reliable replacement that brings the ignition sequence back to factory standards.
If you are experiencing intermittent ignition or a "service heater" light that persists after a reset, this is your fix. It is a straightforward swap that provides immediate peace of mind, making it an essential purchase for anyone maintaining a MasterTemp system.
Raypak Versa-Flame Burner Tray Assembly

The burner tray is the heart of your Raypak heater, and over years of service, the metal can degrade or clog, leading to inefficient combustion. If you notice yellow flames or soot buildup around the heater, it is time to look at a full tray replacement rather than trying to patch individual burners.
This assembly is a comprehensive solution that includes the burners and the necessary mounting hardware. It is ideal for the DIYer who wants to ensure long-term efficiency and safety rather than performing repeated, minor maintenance on an aging tray.
While this is a more involved repair than replacing a sensor, the performance gains are undeniable. If your heater is struggling to reach temperature or emitting an unusual odor, this assembly will effectively revitalize the entire combustion process.
Jandy LXi Heater Thermal Regulator Valve

The thermal regulator valve is a small but mighty component that manages the water temperature entering the heat exchanger. If this valve sticks, your heater may short-cycle, constantly turning on and off because it cannot properly regulate the thermal load.
This is a critical part to keep on hand if you live in an area with hard water, as mineral buildup is the primary enemy of these valves. Replacing it is a relatively simple task that can prevent catastrophic heat exchanger damage caused by overheating.
I suggest this replacement for anyone noticing erratic cycling or "high limit" errors on their LXi heater. It is an inexpensive insurance policy that protects your much more expensive heat exchanger from premature failure.
Zodiac JXi Heat Exchanger Gasket Kit

If you spot water leaking from the bottom of your Zodiac JXi, don’t panic; it is often just a failing gasket rather than a cracked heat exchanger. These seals endure constant thermal expansion and contraction, eventually losing their integrity.
This gasket kit is the gold standard for stopping those annoying drips that can lead to rust and electrical shorts. It is a precise fit, designed specifically to handle the high-pressure environment inside the heater housing.
If you are a DIYer who values preventative maintenance, replacing these gaskets during your annual heater service is a smart move. It is an affordable way to ensure your heater remains watertight and functional for years to come.
Sta-Rite Max-E-Therm Pressure Switch Part
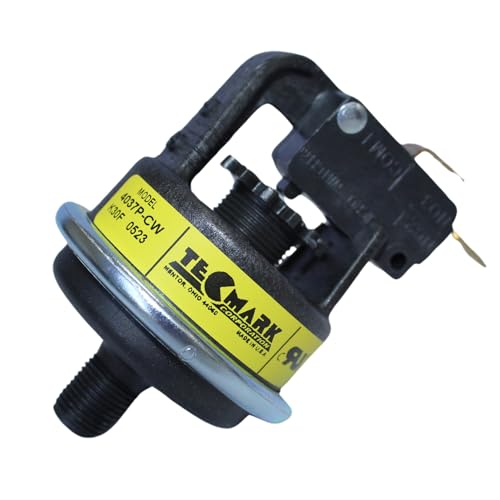
The pressure switch is the safety gatekeeper of your Sta-Rite heater, ensuring the burner only fires when water is safely flowing through the unit. If this switch fails, the heater may refuse to turn on entirely, or worse, attempt to fire without water, which can melt internal components.
This replacement part is highly reliable and easy to install for anyone with basic plumbing knowledge. It is a vital component for those who want to ensure their heater’s safety systems are operating exactly as the manufacturer intended.
If your heater is failing to ignite and you have already confirmed your pump is running, this switch is your most likely path to a fix. It is a simple, effective, and necessary component for any Sta-Rite owner’s spare parts bin.
Safety Protocols for DIY Heater Repairs
Safety must be your absolute priority when working on pool heaters, as you are dealing with electricity, natural gas, and high-pressure water. Always turn off the circuit breaker at the main panel and shut off the gas supply at the manual valve before opening the heater cabinet.
Never attempt to bypass safety sensors or wire around existing safeguards. These components exist to prevent fires and equipment damage, and modifying them creates significant hazards for you and your family.
If you are unsure about the electrical wiring or gas connections, do not hesitate to call a licensed professional. There is no shame in knowing your limits, and the cost of a professional service call is far less than the cost of a fire or a major injury.
Testing Your New Heater Components Properly
Once you have installed your new parts, do not walk away immediately. Perform a "dry run" by turning on the pump first to ensure there are no leaks at any of the connections you touched.
Next, restore the gas and power, and observe the heater through at least one full heating cycle. Listen for unusual sounds and watch the digital display to ensure the temperature rises steadily without triggering any new error codes.
Finally, keep a close eye on the heater for the first 24 hours of operation. Catching a loose connection or a minor leak early will save you from having to repeat the repair process later in the season.
Maintaining Heater Longevity After Repairs
The secret to a long-lasting heater is consistent water chemistry and regular maintenance. High pH or low calcium levels can wreak havoc on your heat exchanger, turning a simple repair into a total replacement nightmare.
Schedule a professional inspection once a year to ensure the gas pressure is balanced and the venting system is clear of debris. Keeping the area around your heater free of landscaping and leaves also ensures proper airflow, which prevents the unit from overheating.
Treat your heater with the same care you give your pool water, and it will reward you with years of comfortable swimming. By staying proactive with your parts replacements and keeping the system clean, you ensure that your backyard oasis remains ready whenever you are.
Tackling your own pool heater repairs is a rewarding way to save money and gain a deeper understanding of your pool’s mechanical systems. By focusing on high-quality replacement parts and adhering to strict safety protocols, you can keep your water warm and inviting all season long. Remember that a little bit of preventative maintenance goes a long way in extending the life of your equipment and maximizing your enjoyment of the water.