9 Ways How to Resurface a Pool Effectively That Pros Trust
Learn to resurface your pool like a pro! Discover when to resurface, choose the right materials, and follow expert steps for lasting results that save money.
Your pool’s surface is showing its age – cracks, stains, and rough patches that make swimming less enjoyable and potentially dangerous. Pool resurfacing isn’t just about aesthetics; it’s essential maintenance that protects your investment and ensures safe swimming conditions for years to come.
The process involves more than slapping on new plaster – successful resurfacing requires proper preparation, material selection, and timing to achieve professional results. Whether you’re dealing with minor surface issues or major structural concerns, understanding the right approach will save you thousands in repairs and give you a pool that looks and feels brand new.
Disclosure: As an Amazon Associate, this site earns from qualifying purchases. Thank you!
Assess Your Pool’s Current Condition and Surface Type
Before diving into any resurfacing project, you’ll need to conduct a thorough evaluation of your pool’s current state. This assessment determines your approach, material choices, and timeline for the entire project.
Identify Signs That Indicate Resurfacing Is Needed
Look for visible cracks that spider across your pool’s surface, especially hairline fractures that collect algae and debris. Check for rough patches that snag swimsuits or scratch your feet during normal use. Examine discolored areas where stains won’t lift despite aggressive cleaning, and notice any chalky residue that appears after brushing.
Determine Your Existing Pool Surface Material
Identify whether you’re working with plaster, pebble aggregate, fiberglass, or painted concrete by examining texture and appearance. Run your hand along smooth areas to feel for the telltale grittiness of aggregate surfaces versus the slick finish of fiberglass. Check installation records or consult with your pool builder to confirm the original material specification and age.
Evaluate the Extent of Damage and Wear
Map out problem areas by walking the entire pool perimeter and noting damage severity on each section. Measure crack lengths and depths using a ruler to document whether you’re dealing with surface-level issues or structural concerns. Consider the damage distribution – isolated problem spots may need spot repairs, while widespread deterioration requires complete resurfacing.
Choose the Right Resurfacing Material for Your Pool
Your material selection determines both your pool’s lifespan and your long-term maintenance commitment. Each resurfacing option brings distinct advantages that align with different priorities and budgets.
Compare Plaster, Pebble, and Tile Options
Plaster offers the most budget-friendly option at $3-5 per square foot but requires replacement every 7-10 years. Pebble aggregate costs $8-12 per square foot yet delivers 15-20 years of durability with superior stain resistance. Tile represents the premium choice at $15-25 per square foot, providing 25+ years of nearly maintenance-free performance.
Consider Budget and Longevity Factors
Your upfront investment directly impacts long-term costs through replacement frequency. Plaster’s lower initial cost becomes expensive when you factor in multiple replacements over 20 years. Pebble aggregate balances initial expense with extended durability, while tile’s higher cost pays dividends through decades of minimal maintenance requirements.
Match Material to Your Pool’s Usage Patterns
Heavy usage pools benefit from pebble or tile surfaces that resist wear from frequent swimming and chemical exposure. Seasonal pools can accommodate plaster since reduced usage extends its lifespan beyond typical expectations. Family pools with children should prioritize pebble’s smooth texture over tile’s potential slip hazards around pool edges.
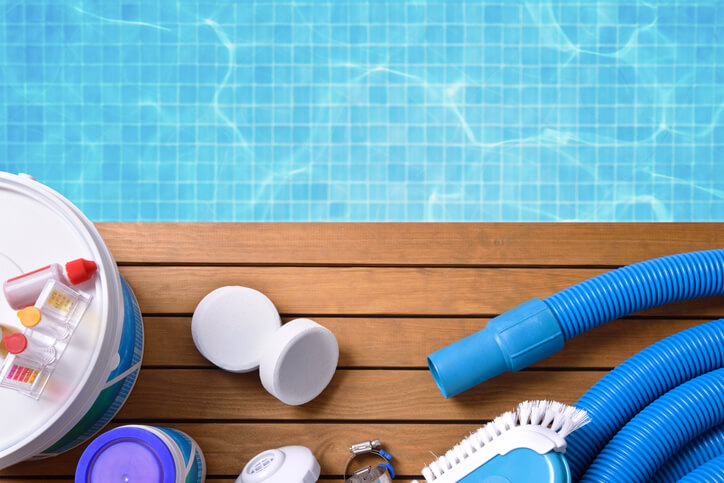
Gather Essential Tools and Materials for Pool Resurfacing
Successful pool resurfacing hinges on having the right equipment and materials before you begin. Missing even one critical tool can derail your project timeline and compromise the final result.
Compile Professional-Grade Equipment List
Pool resurfacing demands precision tools that can handle rough concrete surfaces and chemical mixing. You’ll need a high-pressure washer (minimum 3,000 PSI), diamond grinding discs, industrial mixer, spray gun, and float tools. Don’t forget measuring cups, pH testing strips, and multiple buckets for mixing different compounds throughout the process.
Select Quality Resurfacing Products and Chemicals
Your material choices directly impact durability and appearance for decades. Purchase pool-grade cement, silica sand, polymer additives, and acid-washing chemicals from reputable suppliers. Avoid generic concrete mixes that crack under pool conditions. Quality resurfacing compounds cost 30-40% more than standard materials but prevent premature failure and costly repairs.
Ensure Safety Gear and Protective Equipment
Pool resurfacing involves hazardous chemicals and abrasive materials that can cause serious injury. Wear chemical-resistant gloves, safety goggles, respirator masks, and non-slip boots throughout the entire process. Keep emergency eyewash stations nearby and ensure proper ventilation in enclosed pool areas. Never skip protective gear to save time—acid burns and respiratory damage aren’t worth the risk.
Drain and Prepare Your Pool for Resurfacing
Proper pool preparation sets the foundation for a successful resurfacing job. You’ll need to systematically drain, clean, and repair your pool before applying any new surface material.
Execute Proper Pool Draining Techniques
Start draining your pool using a submersible pump rather than relying on gravity drainage alone. Position the pump at the deepest point and direct discharge water away from your home’s foundation to prevent structural damage. Monitor the draining process closely, as rapid water removal can cause pool walls to shift or crack in unstable soil conditions.
Clean and Remove Old Surface Material
Strip away loose plaster, paint, or surface coatings using a diamond grinding disc attached to an angle grinder. Work systematically across the pool surface, removing all chalky residue and flaking material that could compromise adhesion. Pressure wash the entire surface afterward with a 3000+ PSI washer to eliminate dust and debris from the grinding process.
Repair Structural Issues and Cracks
Fill hairline cracks with hydraulic cement, working the material deep into the fissures with a putty knife. Address larger structural cracks by chiseling them into a V-shape before applying repair compound, ensuring proper bonding with the existing concrete. Allow all repairs to cure for 24-48 hours before proceeding with surface preparation to prevent future failure.
Apply Bonding Agent and Prime the Pool Surface
Your pool surface needs a strong foundation for the new material to adhere properly. The bonding agent creates this critical connection between your prepared pool surface and the fresh resurfacing material.
Select the Appropriate Bonding Product
Epoxy-based bonding agents work best for most pool surfaces because they penetrate deeply and create waterproof seals. Choose products specifically formulated for underwater applications rather than general construction adhesives.
Acrylic bonding agents offer easier cleanup but provide weaker adhesion on heavily worn surfaces. Match your bonding product to your resurfacing material—plaster requires different bonding chemistry than pebble aggregate or tile applications.
Execute Proper Application Techniques
Apply the bonding agent in thin, even coats using a high-quality synthetic brush or roller. Work in 4-foot sections to maintain consistent coverage before the product begins to set.
Keep the surface damp but not soaking wet during application. The bonding agent should penetrate into the prepared surface rather than pooling on top. Remove any excess material immediately to prevent uneven thickness that can cause adhesion failures.
Allow Adequate Curing Time
Most bonding agents require 2-4 hours to become tacky before applying your resurfacing material. Temperature and humidity directly affect curing time—expect longer cure periods in cool or humid conditions.
Test the surface by lightly touching it with your finger. The bonding agent should feel slightly sticky but not transfer to your skin. Applying resurfacing material too early creates weak bonds that lead to premature failure.
Install Your New Pool Surface Material
The bonding agent has cured and your pool is ready for its new surface. This installation phase determines whether your resurfacing project delivers professional results or costly failures.
Follow Manufacturer’s Application Guidelines
Your surface material’s application instructions aren’t suggestions—they’re requirements for warranty coverage and performance. Each material type requires specific mixing ratios, application temperatures, and timing windows that directly affect adhesion strength.
Plaster applications typically require 70-80°F ambient temperatures and specific water-to-powder ratios. Pebble aggregate systems need immediate troweling after application to prevent premature setting.
Maintain Consistent Thickness and Coverage
Your new surface needs uniform thickness to prevent weak spots and premature failure. Most pool surfaces require 3/8-inch minimum thickness across all areas, with deeper application in high-wear zones like steps and benches.
Use gauge rakes or screeds to maintain consistent depth throughout application. Thin spots create stress concentrations that crack within months, while thick areas waste material and increase curing time.
Work in Optimal Weather Conditions
Weather conditions during installation affect your surface’s long-term durability more than any other factor. Ideal conditions include 65-85°F temperatures, low humidity below 60%, and no precipitation forecast for 48 hours.
High temperatures cause rapid moisture loss and surface cracking. Wind speeds above 10 mph create uneven drying patterns that compromise surface integrity and appearance.
Cure and Finish the New Pool Surface
Your pool’s new surface needs proper curing time to reach its full strength and durability. The final finishing steps determine whether your resurfacing investment lasts for decades or fails within a few years.
Monitor Proper Curing Process
Monitor your pool surface’s curing process for 7-14 days depending on material type and weather conditions. Keep the surface continuously moist during the first 48 hours using a fine mist spray system to prevent cracking and ensure proper chemical bonding. Check for white chalky residue or surface irregularities daily during this critical period.
Apply Protective Sealers When Necessary
Apply protective sealers to plaster surfaces after the initial 28-day curing period to extend surface life and reduce maintenance needs. Skip sealers on pebble aggregate finishes since they can trap debris and create maintenance issues over time. Use penetrating sealers rather than topical coatings for better longevity and natural appearance.
Perform Final Surface Smoothing
Perform final surface smoothing using diamond polishing pads on any rough spots or minor imperfections after the curing period completes. Focus on areas around steps and shallow ends where swimmers make contact most frequently to prevent skin abrasions. Test surface texture with your hand to ensure consistent smoothness throughout the entire pool.
Refill and Balance Your Newly Resurfaced Pool
Your newly resurfaced pool needs careful attention during the refilling process to protect the fresh surface and ensure optimal water chemistry from day one.
Execute Gradual Water Refilling Process
Fill your pool slowly using a garden hose with a diffuser attachment to prevent surface damage. Start at the deepest point and maintain steady water flow for 12-24 hours depending on pool size. Monitor the filling process regularly to ensure even water distribution and prevent air pockets from forming behind the new surface material.
Test and Adjust Chemical Balance
Test your water’s pH, alkalinity, and calcium hardness immediately after filling reaches swimming depth. Adjust pH to 7.2-7.6 and total alkalinity to 80-120 ppm using appropriate chemicals. Balance calcium hardness between 150-300 ppm to prevent surface etching or scaling on your fresh resurfaced pool.
Conduct Initial Startup Procedures
Run your filtration system continuously for the first 72 hours to circulate chemicals and remove construction debris. Brush the pool walls and floor daily during the first week to eliminate loose particles and calcium deposits. Add chlorine gradually to maintain 1-3 ppm while avoiding shock treatments that could damage the curing surface.
Maintain Your Resurfaced Pool for Maximum Longevity
Your resurfaced pool represents a significant investment that’ll reward you with years of trouble-free swimming when properly maintained. Consistent care protects your new surface and prevents costly repairs down the road.
Establish Regular Cleaning Routines
Clean your pool surface twice weekly using a soft-bristled brush to prevent algae buildup and mineral deposits. Focus on waterline areas where oils and debris accumulate most heavily.
Skim debris daily and vacuum weekly using gentle suction settings to avoid damaging the fresh surface during its first month.
Monitor Chemical Levels Consistently
Test water chemistry three times per week during the first month after resurfacing to catch imbalances early. Maintain pH between 7.2-7.6 and total alkalinity at 80-120 ppm.
Keep calcium hardness levels appropriate for your surface type – 150-300 ppm for plaster and 200-400 ppm for pebble finishes.
Schedule Preventive Maintenance Tasks
Inspect your pool surface monthly for signs of etching, staining, or texture changes that indicate chemical imbalances. Address issues immediately before they become permanent damage.
Schedule professional water testing quarterly and surface inspections annually to catch problems your routine maintenance might miss.
Conclusion
Pool resurfacing transforms your swimming experience while protecting your investment for years to come. You’ll enjoy crystal-clear water and a surface that looks professionally maintained when you follow proper preparation and application techniques.
Your success depends on choosing the right materials for your specific needs and climate conditions. Remember that quality products and careful attention to detail during installation will save you money and headaches down the road.
The key to long-lasting results lies in patience during the curing process and consistent maintenance afterward. With proper care your newly resurfaced pool will provide countless hours of enjoyment while maintaining its beauty and structural integrity for decades.
Frequently Asked Questions
When should I consider resurfacing my pool?
You should consider pool resurfacing when you notice visible cracks, rough patches, discolored areas, or chalky residue on the surface. These signs indicate deterioration that affects both safety and aesthetics. Additionally, if your current surface is causing discomfort to swimmers or if stains and damage can’t be cleaned with regular maintenance, it’s time for resurfacing.
What are the most popular pool resurfacing materials?
The three most popular resurfacing materials are plaster, pebble aggregate, and tile. Plaster is the most budget-friendly option lasting 7-10 years. Pebble aggregate offers better durability for 15-20 years at a moderate cost. Tile is the premium choice, lasting over 25 years with minimal maintenance but requiring the highest upfront investment.
How long does the pool resurfacing process take?
Pool resurfacing typically takes 7-14 days from start to finish. This includes 1-2 days for draining and preparation, 1 day for surface application, and 7-14 days for proper curing. Weather conditions significantly impact timing, as temperatures between 65-85°F with low humidity are optimal for the curing process.
Can I resurface my pool myself or should I hire professionals?
While DIY resurfacing is possible, it requires specialized equipment like high-pressure washers, diamond grinding discs, and safety gear. Professional expertise ensures proper material selection, surface preparation, and application techniques. Given the complexity and safety requirements, most pool owners benefit from hiring experienced contractors for optimal results and warranty coverage.
How much does pool resurfacing cost?
Pool resurfacing costs vary significantly based on material choice and pool size. Plaster is the most economical option, while pebble aggregate offers mid-range pricing, and tile represents the premium investment. Additional factors affecting cost include surface preparation needs, structural repairs, and local labor rates. Contact contractors for accurate estimates based on your specific pool.
How do I maintain my newly resurfaced pool?
Maintain your resurfaced pool by brushing the surface twice weekly, skimming debris daily, and monitoring chemical levels consistently during the first month. Keep pH between 7.2-7.6, alkalinity at 80-120 ppm, and calcium hardness at appropriate levels. Run filtration continuously for the first 72 hours and avoid aggressive cleaning for the first few weeks.
What happens if I don’t prepare the pool surface properly before resurfacing?
Improper surface preparation can lead to poor adhesion, premature failure, and costly repairs. Without proper cleaning, crack repair, and bonding agent application, the new surface may bubble, crack, or separate from the underlying structure. This can result in having to redo the entire resurfacing project within a few years instead of enjoying decades of durability.
How long should I wait before using my pool after resurfacing?
Wait at least 7-14 days before using your newly resurfaced pool. The surface needs this time to properly cure and reach full strength. During this period, maintain proper water chemistry and run the filtration system continuously for the first 72 hours. Premature use can damage the curing surface and compromise the resurfacing investment.