6 Best Surfboard Tail Repair Kits For Delamination DIY
Fixing surfboard delamination is essential for longevity. Explore our top 6 DIY repair kits designed to restore your board’s integrity and performance easily.
Nothing ruins a perfect swell quite like spotting that telltale "bubble" or soft spot on your surfboard’s tail. Delamination can feel like a death sentence for your favorite board, but with the right approach, it’s often a manageable DIY project. Here is how to restore your board’s integrity and get back in the water without breaking the bank.
Disclosure: As an Amazon Associate, this site earns from qualifying purchases. Thank you!
Understanding Surfboard Delamination Basics
Delamination occurs when the fiberglass skin of your surfboard separates from the foam core, usually due to heat exposure or structural stress. You’ll typically notice a localized bubble or a section that feels "spongy" under thumb pressure. If left unaddressed, water will inevitably seep into the foam, leading to heavier boards and potential rot.
It is a common misconception that all delamination requires a professional shaper’s touch. While major structural failure needs expert attention, minor tail delamination can be fixed at home with patience. Understanding that the foam core is the heart of your board is crucial; keeping that core dry and sealed is your primary goal.
Assessing Damage Before Starting Repairs
Before you buy a kit, perform a thorough inspection of the tail. Push down gently on the delaminated area; if it feels soft or makes a crunching sound, you are dealing with a significant separation that requires more than just a surface patch. Check for cracks in the fiberglass, as these are the entry points for water.
If the area is saturated with water, you must dry the board completely before starting. Do not rush this step, as sealing moisture inside will only accelerate the decay of the foam. A board that feels significantly heavier than usual suggests deep water intrusion, which might require professional vacuum-bagging rather than a simple DIY repair.
Essential Tools for DIY Tail Restoration
Beyond the repair kit itself, you need a few staples to ensure a clean finish. A good set of sandpaper, ranging from 80-grit for stripping to 400-grit for the final polish, is non-negotiable. You’ll also need masking tape to protect the surrounding areas and a plastic squeegee for smoothing out the resin.
Safety should always be your priority, so keep a pair of nitrile gloves and a dust mask handy. Resin fumes can be harsh, and cured epoxy is notoriously difficult to remove from your skin. Having a clean, well-lit workspace will make the difference between a functional patch and a messy, uneven tail.
Solarez Epoxy Repair Putty for Quick Fixes

Solarez is the industry standard for surfers who need to get back in the water by the next tide. This UV-cured putty is incredibly convenient because it eliminates the need for mixing hardeners, which is where most beginners make mistakes. Just apply it in the shade, move it into direct sunlight, and watch it harden in minutes.
However, this product is best suited for small, shallow delaminations or minor dings. If your tail damage is deep or covers a large surface area, the curing process might not penetrate deep enough. Use Solarez if you are looking for a fast, reliable, and temporary-to-permanent fix for minor issues.
Phix Doctor SunPowered Kit for Longevity
Phix Doctor stands out for those who want a comprehensive, all-in-one solution that feels more "pro" than a simple putty. Their kits usually include everything from fiberglass cloth to high-quality resin and sandpaper, making it a great value for the price. The "SunPowered" resin is versatile and cures reliably in various conditions.
This kit is perfect for the DIYer who wants to do the job right the first time and doesn’t mind a slightly longer repair process. It provides a stronger, more structural result than putty alone. If you have a larger delamination that requires a fiberglass patch, this is the kit I would reach for first.
Ding All Epoxy Repair Kit for Precision
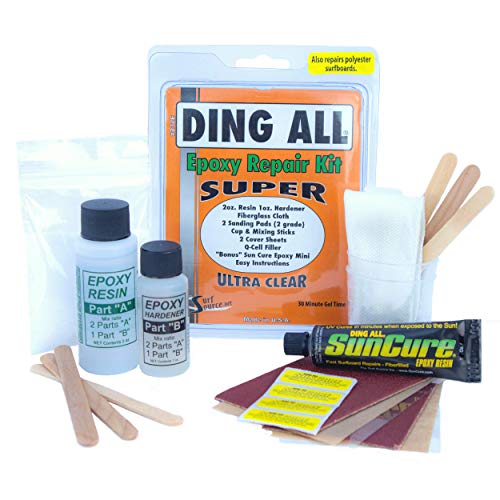
Ding All has been a staple in surf shops for decades, and for good reason. Their epoxy kit is designed for precision, providing a clear, non-yellowing finish that blends seamlessly with modern epoxy boards. It includes a specific measuring tool, which is critical because epoxy ratios must be exact to cure properly.
This is the right choice for the detail-oriented surfer who values aesthetics as much as function. Because it requires careful measuring and mixing, it’s not the fastest option, but it offers the most professional-looking result. If you are fixing a high-end board, skip the quick-fix putties and choose this for its structural integrity and clarity.
FCS Resin Repair Kit for Professional Finish

FCS is a brand you likely already trust for fins and hardware, and their repair kits carry that same level of reliability. These kits are engineered to match the flex patterns of modern surfboards, ensuring that your repair doesn’t create a "stiff spot" on the tail. It is a premium product that provides a very high-strength bond.
I recommend this kit to those who are comfortable with light sanding and fiberglass work. It isn’t the most "beginner-friendly" in terms of ease of use, but the results are top-tier. If you want your board to feel exactly as it did before the damage, FCS is the way to go.
Gorilla Epoxy Glue for Structural Integrity
Get a strong, clear bond with Gorilla 2 Part Epoxy. The easy-to-use syringe dispenses resin and hardener for a 5-minute set, perfect for household repairs and gap filling.

Sometimes, delamination is strictly a separation issue without a hole in the fiberglass. In these specific cases, a high-strength, two-part structural epoxy like Gorilla can be injected under the fiberglass to re-bond the skin to the foam. It is incredibly strong and provides a permanent hold that won’t separate again.
You must be careful to use the clear-drying version and apply it sparingly to avoid adding unnecessary weight. This is a specialized tool for a specific problem, not a general-purpose ding repair product. If you have a clean separation but no cracks, this is the most efficient way to restore structural integrity.
Resin Research Epoxy for Surface Bonding
Resin Research is widely considered the gold standard for high-performance surfboard resins. While usually sold in larger quantities for board builders, their smaller kits are excellent for serious DIYers who want the best chemical bond available. It is UV-stable, meaning it won’t yellow over time, and it has excellent clarity.
This is the choice for the "surfboard nerd" who wants to learn the craft of glassing. It requires a bit more knowledge of mixing and application techniques than a pre-packaged kit, but the longevity is unmatched. Use this if you are planning on doing multiple repairs or want to ensure your board looks pristine for years to come.
Curing and Sanding Your Repaired Tail
The cure is the most critical stage of the process. Even if the resin feels hard to the touch, give it a full 24 hours before heading back to the beach. Rushing the cure can lead to "blushing," where the resin remains tacky or brittle, compromising the entire repair.
Once fully cured, start sanding with a coarse grit to knock down high spots, then transition to finer grits to blend the edges with the original fiberglass. Your goal is a smooth transition that doesn’t create drag or sharp edges. When you can run your hand over the tail and feel no difference between the repair and the original glass, you’ve nailed it.
Repairing your own surfboard is a rewarding skill that keeps your gear in the water and out of the landfill. By selecting the right kit for the specific type of delamination you’re facing, you can ensure your board remains responsive and strong. Take your time with the prep work, and you’ll be back to carving up waves in no time.