
6 Best Hot Tub Parts For Seat Repair That Restore Comfort
Restore your spa’s comfort with these 6 essential hot tub seat repair parts. Learn how to fix worn surfaces and regain relaxation with our expert guide today.
There is nothing quite like sinking into a bubbling hot tub after a long day, only to have that relaxation ruined by a jagged crack or a rough, peeling seat surface. Whether you are dealing with minor cosmetic wear or a deeper structural fissure, ignoring these issues usually leads to more expensive damage down the road. Restoring your spa seat doesn’t have to be a professional-only job, provided you have the right materials and a little bit of patience.
Disclosure: As an Amazon Associate, this site earns from qualifying purchases. Thank you!
Assessing Hot Tub Seat Damage and Wear
Before you reach for any adhesive, you need to determine exactly what you are fighting. Run your hand carefully over the affected area to distinguish between a hairline stress crack, a deep gouge, or simple surface degradation like blistering or fading. A crack that catches your fingernail is a structural concern that requires a filler or epoxy, while surface wear might just need a patch or a sealant.
Don’t mistake a simple surface scratch for a shell breach. If the water level in your tub is dropping, you are likely dealing with a full-thickness crack that requires a more robust, waterproof repair. Always drain the tub and allow the area to dry completely before making a diagnosis, as moisture can hide the true extent of the damage.
Identifying Your Specific Shell Material
Most modern hot tubs are constructed from acrylic, though older models or budget-friendly options often use fiberglass or vinyl-coated surfaces. Identifying your shell material is non-negotiable because using the wrong adhesive can cause the material to warp, melt, or fail to bond entirely. Acrylic is rigid and smooth, while fiberglass has a distinct, porous texture that often requires a specialized bonding agent.
If you are unsure of your tub’s composition, check the manufacturer’s manual or look for a serial number plate to search the model online. Using a generic "one-size-fits-all" glue is the fastest way to turn a small repair into a permanent, unsightly scar on your spa shell. When in doubt, perform a small test patch in an inconspicuous area, such as near the filter housing or under a seat lip, to ensure the product doesn’t react poorly with your shell.
Gorilla Waterproof Patch and Seal Tape
If you need an immediate, "get-back-in-the-water" solution, Gorilla Waterproof Patch and Seal Tape is your best bet for emergency mitigation. This isn’t a permanent structural fix for a major crack, but it is incredibly effective at stopping leaks in their tracks. It is thick, rubberized, and adheres aggressively to almost any surface, even under water if you are in a pinch.
I recommend this for homeowners who need to bridge a gap while waiting for a professional part or a more permanent epoxy cure. It is perfect for those who prioritize function over aesthetics, as the tape is visible and not exactly "invisible" once applied. If you have a temporary leak that is ruining your evening, this tape is the ultimate reliable backup to keep in your garage.
Permatex Clear Silicone Adhesive Sealant

For those annoying, small hairline cracks that aren’t quite structural but are definitely uncomfortable, Permatex Clear Silicone is a fantastic choice. It remains flexible after it cures, which is crucial because hot tub shells expand and contract significantly as the water temperature fluctuates. If you use a rigid glue here, it will simply crack again within a few weeks.
This sealant is ideal for the DIY enthusiast who wants a clean, unobtrusive finish. Because it dries clear, it blends well with most acrylic colors, making it excellent for cosmetic touch-ups. If you are looking for a reliable, easy-to-apply solution for minor fissures, this is the product you want in your repair kit.
Fibro Pool DIY Spa Shell Repair Kit
Easily repair underwater leaks and cracks with this hand-moldable putty. It cures underwater without shrinking or sagging, restoring chipped tiles and stopping leaks without draining your pool.
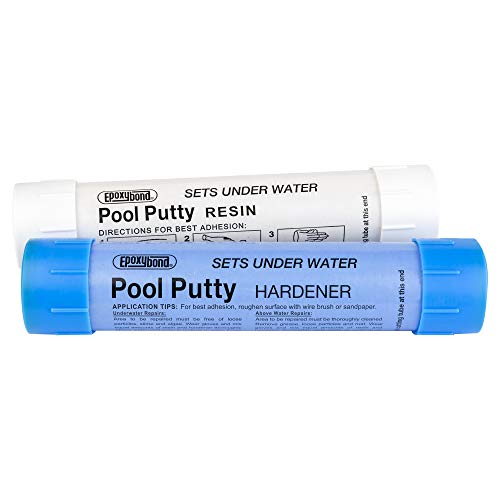
When you are dealing with a deeper gouge that has compromised the integrity of the shell, you need a dedicated repair kit like the Fibro Pool system. These kits typically include a color-matched filler and a hardener that chemically bond with the acrylic, essentially "welding" the plastic back together. It is a more involved process than just applying tape, but the results are vastly superior.
This kit is designed for the person who wants a permanent, professional-grade finish that restores the smooth feel of the seat. It requires careful sanding and blending, so it is best for those who don’t mind spending an afternoon on maintenance. If you want your repair to be virtually undetectable, this is the gold standard for your toolkit.
Loctite Marine Epoxy for Rigid Repairs
Loctite Marine Epoxy creates a strong, waterproof bond on wet surfaces, making it ideal for underwater repairs. The convenient double syringe ensures easy and accurate mixing for a durable, resilient finish on various materials.
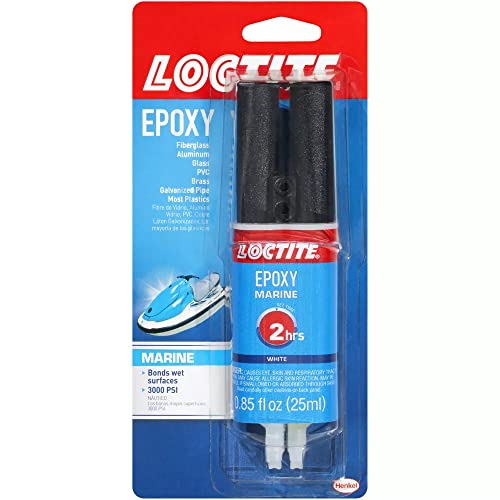
Loctite Marine Epoxy is the heavy hitter for structural repairs where strength is the primary objective. Unlike silicone, this epoxy cures into a rock-hard, waterproof bond that can withstand the pressure of thousands of gallons of water pushing against it. It is specifically formulated for marine environments, meaning it won’t break down when exposed to hot, chlorinated water.
This product is for the serious DIYer tackling a significant crack or a structural break in the seat support. Because it is so rigid, it is not suitable for areas that need to flex, but for a solid shell crack, it is unmatched in durability. If you need a "set it and forget it" repair that will last for years, look no further than this marine-grade powerhouse.
Marideck Vinyl Seat Patch Repair Kit
If you own a portable or inflatable hot tub, your seat surface is likely vinyl rather than acrylic. Applying hard epoxy to vinyl is a recipe for disaster, as it will simply peel off the moment the material flexes. Marideck kits provide a flexible, adhesive patch that moves with the vinyl, preventing further tearing.
This is the only logical choice for soft-sided spa owners. It is simple to apply and designed to withstand constant submersion in chemically treated water. If you have a puncture in an inflatable seat, this kit is the most reliable, long-term fix available for that specific material.
3M Marine Grade Adhesive Sealant 5200

3M 5200 is legendary in the boating world, and it transitions perfectly to the hot tub industry for high-stress sealing. This is an incredibly strong, permanent adhesive that is best used for bonding two surfaces together or sealing a stubborn, persistent leak that other products have failed to fix. Note that it is extremely difficult to remove once cured, so use it only when you are certain this is the permanent solution.
This is for the homeowner who is tired of repeated repairs and wants to seal a leak once and for all. It is not for the faint of heart, as it requires a long curing time, often up to a week for a full, structural cure. If you have a persistent, high-pressure leak, 3M 5200 is the final word in sealing.
Proper Application and Curing Techniques
The secret to a successful repair isn’t just the product; it is the preparation. You must sand the area around the crack to create a "tooth" for the adhesive to grab onto, and then clean it thoroughly with isopropyl alcohol to remove any oils or residue. If the surface is oily, even the best epoxy will eventually lift.
Patience is your greatest asset during the curing phase. Always follow the manufacturer’s recommended cure time to the letter, even if the product feels dry to the touch after an hour. Rushing the process by filling the tub too early will introduce moisture into the bond, leading to premature failure and a repeat of the entire project.
Maintaining Seat Integrity After Repairs
Once your repair is cured, keep an eye on your water chemistry to ensure it doesn’t degrade your work. High pH or improper sanitizer levels can weaken adhesives over time, so maintain a consistent balance to protect your investment. Regularly wiping down the repaired area with a soft, non-abrasive cloth will help prevent new surface scratches from forming.
Treat your repaired seat with the same care you would a brand-new tub. Avoid dragging heavy objects or sharp items across the repair site, and consider using a high-quality spa cover to shield the shell from UV rays when not in use. With consistent maintenance and a watchful eye, your repair will hold up for years, keeping your relaxation sessions exactly as they should be: comfortable and worry-free.
Repairing your hot tub seat is a manageable task that pays dividends in both comfort and the longevity of your spa. By identifying your shell material and choosing the right adhesive for the job, you can easily handle most cracks and gouges yourself. Take your time with the prep work, respect the curing times, and you will be back to enjoying your soak in no time.
