7 How to Accurately Interpret Pool Testing Strip Results Pro Tips
Master pool test strip reading to maintain safe, crystal-clear water. Learn proper timing, technique, and interpretation to avoid costly chemical mistakes.
You dip that colorful test strip into your pool water and pull it out – but now what? Those little colored squares might look like a rainbow but they’re actually telling you everything you need to know about your pool’s health and safety.
Reading pool test strips correctly isn’t rocket science but it’s the difference between crystal-clear water and a green swamp that’ll send your summer plans down the drain. Most pool owners make critical mistakes when interpreting these results which leads to chemical imbalances expensive repairs and unsafe swimming conditions.
The bottom line: Master this simple skill and you’ll save money avoid headaches and keep your pool sparkling all season long.
Disclosure: As an Amazon Associate, this site earns from qualifying purchases. Thank you!
Understanding the Basics of Pool Testing Strips
Get accurate blood glucose readings quickly with Contour Next test strips. These strips require no coding and feature second-chance sampling, saving you time and money. Compatible with all Contour Next meters.

Pool testing strips serve as your first line of defense against water chemistry problems. These simple tools provide instant feedback about your pool’s chemical balance without requiring complex equipment or professional training.
Types of Pool Testing Strips Available
Basic 2-in-1 strips test chlorine and pH levels for essential water balance monitoring. Multi-parameter strips measure up to seven different chemicals including total alkalinity, cyanuric acid, and hardness levels.
Quickly and easily test your water quality with this kit. Measures Free Chlorine, Total Chlorine, Hardness, Alkalinity, and pH levels to ensure safe and balanced water.

Specialty strips focus on specific issues like copper detection or phosphate levels. Professional-grade strips offer more precise readings but cost significantly more than standard versions.
Key Parameters Measured by Testing Strips
Free chlorine levels indicate your pool’s sanitizing power and infection prevention capability. pH readings determine water comfort and chemical effectiveness for swimmers.
Total alkalinity measures your water’s ability to resist pH changes and maintain stability. Calcium hardness shows mineral content that affects equipment longevity and water clarity.
When to Use Testing Strips vs. Liquid Test Kits
Discover your origins with AncestryDNA. Get a detailed ethnicity estimate from over 2,600 regions and connect with living relatives through our easy-to-use DNA test kit.

Use testing strips for daily monitoring and quick chemical adjustments during regular maintenance routines. Choose liquid test kits when you need precise readings for major chemical corrections or troubleshooting problems.
Strips work best in routine situations with stable water conditions and consistent chemical usage. Liquid kits excel during pool opening, closing, or when dealing with algae blooms and unusual water issues.
Preparing for Accurate Pool Water Testing
Getting reliable results from your pool testing strips starts well before you dip them in the water. Proper preparation ensures you’ll get readings you can trust for making chemical adjustments.
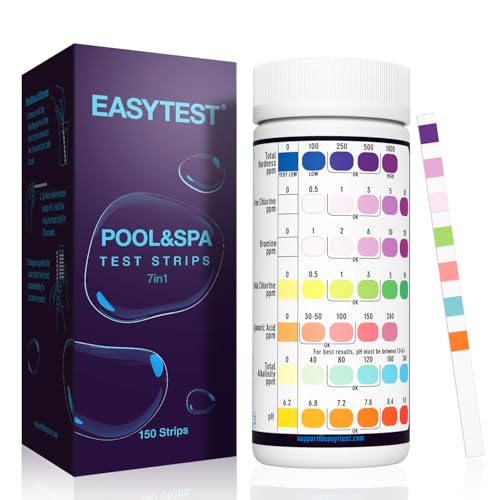
Test your pool or spa water quickly and accurately with these 7-in-1 test strips. Get results in seconds for Bromine, Alkalinity, pH, Chlorine, Hardness, Cyanuric Acid, and Total Chlorine using the easy-to-read color chart.
Optimal Timing for Testing Your Pool Water
Test your pool water in the early morning or evening when direct sunlight won’t interfere with readings. Avoid testing immediately after adding chemicals, heavy rain, or pool parties. Wait at least 6-8 hours after chemical additions and 24 hours after shock treatments for accurate results.
Quickly restore crystal-clear pool water with HTH Shock Advanced. This fast-dissolving, multi-functional formula kills bacteria and algae while reducing chlorine odor and irritation, and it's compatible with all pool types.

Proper Storage and Handling of Testing Strips
Store your testing strips in a cool, dry place with the cap tightly sealed to prevent moisture damage. Keep them away from pool chemicals and direct sunlight, which can degrade the reagents. Replace strips that appear discolored or have been exposed to humidity for extended periods.
Pre-Testing Pool Water Preparation Steps
Turn off your pool’s circulation system and wait 30 minutes before testing to allow water to settle. Collect water samples from elbow-deep areas away from return jets and skimmers. Rinse your hands thoroughly before handling strips to avoid contaminating the reagent pads with oils or lotions.
Following the Correct Testing Strip Procedure
Now that you’ve prepared your pool and equipment, executing the proper testing technique determines whether your readings accurately reflect your water’s condition.
Step-by-Step Strip Dipping Technique
Submerge the strip completely in pool water at elbow depth, holding it underwater for exactly one second. Don’t swirl or move the strip around – this dilutes the chemical pads and creates false readings.
Remove the strip quickly and shake off excess water with one firm downward motion. Hold the strip level to prevent chemicals from bleeding between test pads.
Timing Requirements for Each Test Parameter
Start your timer immediately after removing the strip from water. pH and chlorine readings develop within 15 seconds, while alkalinity and hardness require 30-60 seconds.
Read each parameter at its specified time – don’t wait for all pads to fully develop. Early readings for slow-developing tests give inaccurate results that’ll throw off your chemical balancing.
Avoiding Common Testing Mistakes
Never dip strips in skimmer baskets or near return jets where concentrated chemicals create artificially high readings. These areas don’t represent your pool’s overall water chemistry.
Don’t reuse strips or compare faded results from previous tests. Chemical pads lose accuracy within minutes of exposure to air and moisture, making old readings unreliable for current conditions.
Reading and Interpreting Color Results
Once you’ve dipped your strip and waited the proper time, comparing colors becomes your next critical step for accurate pool maintenance.
Understanding the Color Chart Reference Guide
Your test strip package includes a color chart that serves as your chemical roadmap. Hold the chart at arm’s length in natural light, avoiding direct sunlight that can distort color perception.
Match each color pad on your strip to the corresponding chart section, reading from left to right in the exact order specified. Don’t skip around—each parameter has a specific position that prevents confusion.
Identifying Subtle Color Variations and Differences
Color differences between chart segments can be extremely subtle, especially in pH and alkalinity ranges. Look for slight shifts in hue rather than dramatic color changes.
Pink-to-red chlorine readings show gradual progression, while pH shifts from orange to green in barely perceptible steps. Train your eye by comparing multiple strips over time to recognize these nuanced variations.
Dealing with Unclear or Borderline Color Matches
When your strip falls between two chart colors, record the lower reading to avoid over-treating your pool. Borderline matches often indicate you’re close to ideal levels.
Take a second test strip immediately if colors appear ambiguous—lighting conditions or strip age might affect accuracy. If both strips show similar borderline results, split the difference and adjust chemicals conservatively.
Interpreting Chlorine Level Results
Chlorine readings form the backbone of your pool’s sanitization system. Understanding what these numbers mean determines whether your water stays crystal clear or becomes a breeding ground for bacteria.
Free Chlorine vs. Total Chlorine Readings
Free chlorine represents the active sanitizer that’s actually working to kill bacteria and algae in your pool. Total chlorine includes both free chlorine and combined chlorine (chloramines) that’s already used up.
You’ll want your free chlorine reading to closely match your total chlorine reading. When total chlorine significantly exceeds free chlorine, you’re dealing with chloramine buildup that creates that harsh chemical smell.
Ideal Chlorine Range Guidelines
Your free chlorine should consistently read between 1.0 and 3.0 parts per million (ppm) for residential pools. Commercial pools typically require 2.0 to 4.0 ppm due to higher bather loads.
Most pool professionals recommend targeting 2.0 ppm as your sweet spot. This level provides effective sanitization without causing skin or eye irritation for swimmers.
What Low and High Chlorine Levels Mean
Low chlorine readings below 1.0 ppm indicate insufficient sanitization that allows bacteria and algae to flourish. You’ll notice cloudy water and potential algae growth within 24-48 hours.
High chlorine above 5.0 ppm creates harsh swimming conditions with strong chemical odors and potential skin irritation. Swimmers often experience burning eyes and bleached swimwear at these elevated levels.
Understanding pH Level Measurements
pH readings reveal how acidic or basic your pool water is on a scale from 0 to 14. This measurement directly affects swimmer comfort and determines how well your pool chemicals work.
Optimal pH Range for Pool Water
Ideal pH levels fall between 7.2 and 7.6 for residential pools. This range keeps your water slightly basic, which protects pool equipment and maintains swimmer comfort. Commercial pools should target 7.2 to 7.8 to handle higher bather loads effectively.
Effects of High and Low pH Readings
High pH above 7.8 causes cloudy water and scale buildup on pool surfaces. Swimmers experience eye irritation and skin dryness in basic water. Low pH below 7.0 creates acidic conditions that corrode metal fixtures and etch plaster surfaces. You’ll notice stinging eyes and potential equipment damage.
Relationship Between pH and Chemical Effectiveness
Chlorine loses 80% of its sanitizing power when pH rises above 8.0. Your pool strips might show adequate chlorine levels, but the chemical can’t effectively kill bacteria and algae in high-pH water. Maintaining proper pH ensures your sanitizer works at maximum efficiency.
Analyzing Total Alkalinity Results
Total alkalinity acts as your pool water’s buffer system, preventing dramatic pH swings that can turn your swimming experience into a chemistry nightmare.
Recommended Alkalinity Levels for Pools
Your pool’s total alkalinity should stay between 80 and 120 parts per million (ppm) for optimal water balance. Residential pools perform best at 100-120 ppm, while commercial facilities can operate effectively at the lower end of this range. Saltwater pools require slightly higher alkalinity levels, typically 100-150 ppm, to compensate for the salt chlorine generator‘s pH-raising effects.
How Alkalinity Affects Water Balance
Alkalinity stabilizes your pool’s pH levels, preventing the constant adjustments that frustrate pool owners. When alkalinity drops below 80 ppm, your pH becomes erratic and difficult to control, leading to equipment corrosion and swimmer discomfort. High alkalinity above 150 ppm locks your pH in place, making it nearly impossible to lower even with acid additions.
Troubleshooting Alkalinity Issues
Low alkalinity requires sodium bicarbonate (baking soda) additions at 1.5 pounds per 10,000 gallons to raise levels by 10 ppm. High alkalinity needs muriatic acid treatment, but you’ll need patience since lowering alkalinity also drops pH significantly. Add acid gradually over several days, allowing pH to rise naturally between treatments, then repeat until you reach your target alkalinity range.
Reading Calcium Hardness Measurements
Calcium hardness measurements reveal whether your pool water will protect or damage your equipment and surfaces. Understanding these readings helps you prevent costly repairs and maintain crystal-clear water.
Understanding Hard vs. Soft Water Indicators
Hard water indicators on your test strip show darker colors, typically appearing as deeper blues or purples when calcium levels exceed 300 ppm. Soft water creates lighter shades, often pale yellows or light blues, indicating calcium levels below 150 ppm. You’ll notice the color intensity directly correlates with mineral concentration in your water.
Ideal Calcium Hardness Ranges
Maintain calcium hardness between 200-400 ppm for optimal pool performance, with 250-350 ppm being the sweet spot for most residential pools. Plaster pools require higher levels around 300-400 ppm to prevent surface etching. Vinyl and fiberglass pools can operate safely at the lower end of this range without equipment damage.
Preventing Scale Formation and Corrosion
Low calcium levels below 150 ppm cause aggressive water that corrodes metal fixtures and etches pool surfaces. High levels above 400 ppm create scale buildup on tiles, heaters, and pool equipment. You’ll prevent both issues by testing weekly and adjusting calcium gradually using calcium chloride or dilution methods.
Taking Action Based on Test Results
Once you’ve interpreted your test strip readings, swift action prevents minor imbalances from becoming major pool problems. The key is systematic adjustment rather than reactive overcorrection.
Creating a Chemical Adjustment Plan
Develop a priority system for chemical adjustments based on your test results. Address pH first since it affects chlorine effectiveness, then tackle alkalinity if it’s outside the 80-120 ppm range. Save calcium hardness adjustments for last unless readings are severely low.
Calculate exact chemical amounts using your pool’s volume before adding anything. This prevents the common mistake of dumping chemicals and hoping for the best.
Prioritizing Multiple Water Chemistry Issues
Fix pH problems immediately when readings fall below 7.0 or above 7.8 since extreme levels render chlorine nearly useless. Low alkalinity comes next because it causes pH to bounce wildly between tests.
Handle chlorine adjustments after pH stabilizes to avoid wasting sanitizer. High calcium hardness can wait 24-48 hours unless you’re seeing visible scale formation on surfaces.
Record Keeping for Pool Maintenance Tracking
Document every test result with date, time, and weather conditions in a simple logbook or phone app. This pattern recognition helps you anticipate problems before they develop.
Track chemical additions alongside test results to identify what works for your specific pool. You’ll quickly learn whether your pH tends to drift high or low between maintenance sessions.
Troubleshooting Inaccurate Test Results
Even with perfect technique, you’ll sometimes get test strip readings that don’t match your pool’s actual condition or seem inconsistent with previous results.
Identifying Factors That Affect Strip Accuracy
Direct sunlight degrades test strip chemicals within seconds of exposure, causing false readings that typically show lower chlorine levels. Store strips in their original container and read results in shade or indoors.
Recent chemical additions create hot spots that skew readings for up to 4 hours after treatment. Test away from return jets and wait adequate circulation time before retesting problematic areas.
When to Confirm Results with Professional Testing
Borderline readings between two color ranges require liquid test kit confirmation before making significant chemical adjustments. Your local pool store’s computerized testing provides precise numerical values when strip colors appear ambiguous.
Persistent algae or cloudiness despite normal strip readings indicates potential interference from organic compounds. Professional testing identifies hidden issues like combined chlorine or phosphate levels that standard strips can’t detect.
Replacing Expired or Contaminated Test Strips
Moisture exposure turns test pads brown or purple even when containers appear sealed, rendering all readings unreliable. Replace entire bottles if any strips show discoloration or if you’ve stored them in humid environments.
Strips older than 18 months lose reagent potency regardless of appearance, typically showing artificially low chlorine readings. Write purchase dates on bottles and replace proactively rather than questioning inconsistent results.
Conclusion
Mastering pool test strip interpretation puts you in complete control of your pool’s water quality. With consistent testing and proper technique you’ll catch chemical imbalances before they become expensive problems.
Remember that accurate readings depend on proper timing storage and careful color matching. Your strips are only as reliable as your testing method so take time to follow each step correctly.
Keep your test log updated and trust your results to guide chemical adjustments. When you understand what your strips are telling you maintaining crystal-clear water becomes second nature rather than guesswork.
Frequently Asked Questions
How often should I test my pool water using test strips?
Test your pool water daily during peak swimming season and 2-3 times per week during off-season. Test strips are perfect for regular monitoring and quick adjustments. For more precise readings during significant chemical corrections or troubleshooting, consider using liquid test kits instead.
What’s the best time of day to test pool water?
Test your pool water early morning or evening when direct sunlight won’t interfere with color readings. Avoid testing immediately after adding chemicals, during heavy rain, or within 8 hours of shock treatment. Turn off circulation systems and wait 30 minutes before collecting samples.
What are the ideal chemical levels I should maintain in my pool?
Maintain free chlorine between 1.0-3.0 ppm, pH between 7.2-7.6, total alkalinity between 80-120 ppm, and calcium hardness between 200-400 ppm. These ranges ensure safe swimming conditions, effective sanitization, and protection of pool equipment and surfaces.
How do I properly read the color results on test strips?
Hold the color chart at arm’s length in natural light and match colors in the specified order within the recommended time frame. Read each parameter at its designated time (usually 15-30 seconds). When results appear borderline, record the lower reading to avoid over-treating your pool.
Why is my test strip showing inaccurate results?
Inaccurate results often occur from testing in direct sunlight, using expired strips, testing too soon after chemical additions, or collecting samples near return jets. Store strips in cool, dry places and replace any that appear discolored or are older than 18 months.
What should I do if my chlorine levels are too low or too high?
For low chlorine (below 1.0 ppm), add chlorine shock or increase daily chlorination. For high chlorine (above 5.0 ppm), stop adding chlorine and allow levels to naturally decrease through sunlight and swimming activity. Always retest after 24 hours to confirm adjustments.
How does pH affect my pool’s chlorine effectiveness?
pH directly impacts chlorine’s sanitizing power. When pH exceeds 8.0, chlorine loses 80% of its effectiveness. Maintain pH between 7.2-7.6 for optimal chlorine performance. Low pH (below 7.0) can cause skin irritation and equipment corrosion, while high pH creates cloudy water.
When should I use liquid test kits instead of test strips?
Ensure a healthy freshwater aquarium with the API Master Test Kit. Accurately monitor pH, ammonia, nitrite, and nitrate levels with this comprehensive kit, designed for weekly use and problem diagnosis.

Use liquid test kits when you need precise readings for major chemical adjustments, troubleshooting persistent water problems, or confirming unusual test strip results. Test strips are ideal for daily monitoring and routine maintenance, while liquid kits provide more accurate measurements for complex situations.
What’s the difference between free chlorine and total chlorine?
Free chlorine is the active sanitizer that kills bacteria and algae. Total chlorine includes both free chlorine and combined chlorine (chloramines). If total chlorine significantly exceeds free chlorine, you have chloramine buildup requiring shock treatment to restore proper sanitization.
How do I adjust total alkalinity in my pool?
To raise low alkalinity, add sodium bicarbonate (baking soda) gradually. To lower high alkalinity, use muriatic acid carefully in small amounts. Always adjust alkalinity before pH, as alkalinity acts as a buffer system preventing dramatic pH swings. Make gradual changes and retest after 24 hours.