7-Step Pool Closing Checklist for Beginners That Prevents Damage
Master pool winterization with our 7-step beginner’s guide! Protect your investment from freeze damage, chemical imbalances, and costly spring repairs.
Winter’s approaching and your backyard pool needs proper winterization to survive the cold months ahead. Many first-time pool owners make costly mistakes when closing their pools—from chemical imbalances that cause algae blooms to equipment damage from freezing water. Following a systematic 7-step process protects your investment and ensures you’ll open to crystal-clear water next spring.
Disclosure: As an Amazon Associate, this site earns from qualifying purchases. Thank you!
Clean Your Pool Thoroughly Before Closing
A spotless pool is your foundation for successful winterization. Debris and contaminants left behind create problems that’ll haunt you come spring opening.
Remove All Debris From Pool Surface and Bottom
Skim every leaf, twig, and floating debris from your pool’s surface using a leaf net. Large debris breaks down over winter, creating organic matter that feeds algae and bacteria.
Vacuum the pool bottom thoroughly to eliminate settled dirt and smaller particles. Don’t forget corners and steps where debris typically accumulates during regular use.
Brush Pool Walls and Vacuum Entire Pool
Brush all pool walls, steps, and corners to loosen algae and buildup before vacuuming. Use a stiff brush for concrete pools or a softer brush for vinyl and fiberglass surfaces.
Vacuum the entire pool again after brushing to capture dislodged particles. This double-cleaning approach ensures you’re not sealing contaminants under your winter cover.
Empty All Skimmer Baskets and Pool Equipment
• COMPATIBILITY: Fits most common above ground pool skimmers; not compatible with in ground pools. We encourage all customers to measure their baskets ahead of time to be safe. If your current basket is wider than 7" or has a rim that isn't perfectly round, this will not work with your skimmer • ALWAYS PREPARED: 2 pack gives you a spare basket to make it through the season • CLEAN AND CLEAR: Measuring roughly 6 inches by 4 inches, FibroPool skimmer baskets are a perfect replacement for most above ground pool skimmers • OUT OF THE WAY: Pivot handle conveniently moves to avoid trapping sticks and other debris

Remove and clean all skimmer baskets, pump baskets, and any removable pool equipment. Organic matter left in baskets decomposes over winter, creating stains and odors.
Store cleaned baskets indoors to prevent cracking from freeze-thaw cycles. Check your pool’s main drain cover and remove any trapped debris before proceeding to chemical balancing.
Balance Your Pool Water Chemistry
Getting your water chemistry right before closing prevents algae growth and protects your pool surfaces during winter months.
Test and Adjust pH Levels to 7.2-7.6 Range
Test your pool’s pH using reliable test strips or a digital tester before adding any chemicals. High pH levels above 7.6 cause chlorine to become less effective and can lead to scale buildup on your pool walls. Add muriatic acid or sodium bisulfate to lower pH, or use sodium carbonate to raise it if it’s below 7.2.
Ensure Total Alkalinity is Between 80-120 ppm
Check your total alkalinity first since it acts as a buffer for pH stability throughout winter. Low alkalinity causes pH to fluctuate wildly, making your pool harder to balance when you reopen it. Add sodium bicarbonate (baking soda) to raise alkalinity, or use muriatic acid to lower it if it exceeds 120 ppm.
Check and Balance Calcium Hardness Levels
Measure calcium hardness levels and aim for 150-300 ppm to protect your pool’s surfaces. Low calcium hardness causes water to become aggressive and can damage plaster, grout, and metal components over winter. Add calcium chloride to raise hardness levels, but if they’re too high, partial water replacement is your only option.
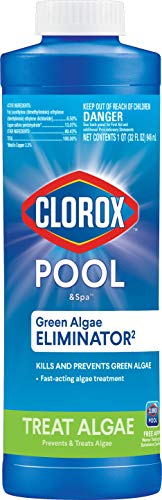
Shock Your Pool Water One Final Time
Shocking your pool before winter closure oxidizes contaminants and creates a sterile environment that prevents algae formation during months of inactivity. This critical step sets the foundation for clean water when you reopen next season.
Add Pool Shock According to Manufacturer Instructions
Quickly kill bacteria and algae with Clorox Pool&Spa™ Shock XTRABLUE® Plus. This fast-dissolving formula clears water and makes it swim-ready in just 15 minutes.

Follow the shock package directions precisely for your pool’s gallon capacity. Most pools require 1-2 pounds of calcium hypochlorite shock per 10,000 gallons. Add shock directly to deep water while your pump runs to ensure proper distribution throughout the system.
Run Pool Pump for 8-12 Hours After Shocking
Keep your pool crystal clear with the KimFilter Pro Series 1000 GPH filter pump. It uses hydroaeration technology and an efficient Type A/C cartridge to powerfully circulate and filter your pool water, removing debris and maintaining a healthy pH balance.

Circulate the shocked water for at least 8 hours to distribute chlorine evenly throughout your pool. This extended run time allows the shock to reach every corner and crevice. Check that your filtration system captures dead algae and organic matter loosened by the treatment.
Wait 24 Hours Before Adding Winterizing Chemicals
Easily close your pool for winter with this all-in-one chemical kit. Protects up to 15,000 gallons and includes winterizer, stain-away, chlorine-free shock, and an oil-absorbing Winter Sorb to prevent waterline scum.

Allow chlorine levels to drop below 3 ppm before introducing winterizing chemicals like algaecide and antifreeze. Adding winter chemicals too early creates chemical conflicts that reduce their effectiveness. Test your water after 24 hours to confirm safe chlorine levels for the next winterization step.
Add Winterizing Chemicals to Prevent Algae Growth
After your pool shock has circulated and chlorine levels drop below 3 ppm, you’re ready to add specialized winterizing chemicals. These products work together to maintain water quality during months of inactivity.
Apply Algaecide Throughout Pool Water
Keep your pool crystal clear with Clorox Pool&Spa Algaecide. This non-foaming formula quickly eliminates existing algae and prevents future growth in all pool types, including saltwater.
Add copper or polyquat-based algaecide at 2-4 times the normal summer dose to create a protective barrier against algae formation. Pour the algaecide around your pool’s perimeter while the pump runs to ensure even distribution throughout all 10,000+ gallons of water.
Add Pool Antifreeze to Prevent Pipe Damage
Protect your pool and spa from freezing damage down to -50°F with Splash Antifreeze. This environmentally safe formula is designed for aquatic environments and includes a winterizing guide.

Pour pool antifreeze directly into skimmer lines and return jets to protect plumbing from freeze damage. Use 1 gallon per skimmer line and add extra antifreeze to spa jets if you have an attached hot tub system.
Use Enzyme Products to Break Down Organic Matter
Apply enzyme-based pool cleaners to eliminate oils and organic debris that standard sanitizers can’t remove completely. These products continue breaking down sunscreen residue, body oils, and leaf matter throughout winter months when your filtration system isn’t running.
Lower Your Pool Water Level Properly
Proper water level adjustment protects your pool’s plumbing and equipment from freeze damage while maintaining structural integrity throughout winter.
Drain Water Below Skimmer and Return Jets
You’ll need to lower water 4-6 inches below the skimmer opening and return jets to prevent freeze damage. Use your pool pump or a submersible pump to remove water gradually. This prevents ice expansion from cracking your skimmer box or damaging return jet fittings during freezing temperatures.
Maintain Proper Water Level for Your Pool Type
Above-ground pools require water levels 1-2 inches below the skimmer for optimal winter protection. In-ground pools need water lowered to the bottom of the tile line or 6 inches below coping. Vinyl liner pools should maintain slightly higher levels to prevent liner shrinkage and potential damage.
Avoid Draining Pool Completely Unless Necessary
Complete drainage can cause serious structural problems including pool popping from groundwater pressure. Your pool shell needs water weight for stability year-round. Only drain completely for major repairs or when recommended by a pool professional for specific structural issues.
Winterize All Pool Equipment and Plumbing
Protecting your pool equipment from freeze damage requires removing water from all plumbing lines and components. Ice expansion can crack expensive equipment and create costly repairs when spring arrives.
Drain Pool Pump, Filter, and Heater Systems
Drain your pool pump completely by removing the drain plugs located at the bottom of the pump housing. Store these plugs in the pump basket so you won’t lose them over winter. Empty your filter housing and cartridge or sand filter according to manufacturer instructions. Heater systems need special attention – drain the heat exchanger and remove all drain plugs to prevent freeze damage.
Blow Out Pool Lines Using Shop Vacuum or Compressor
Blow compressed air through all pool lines to remove remaining water that gravity drainage can’t eliminate. Connect your shop vacuum or air compressor to the skimmer and return lines at the equipment pad. Continue blowing until you see bubbles emerging from the pool jets and returns. This process typically takes 2-3 minutes per line to ensure complete water removal.
Add Pool Plugs to All Openings and Fittings
Install expansion-type pool plugs in all skimmer returns, main drain lines, and equipment connections immediately after blowing out the lines. These rubber plugs expand when tightened to create watertight seals. Apply pool-safe thread sealant to threaded plugs for extra protection. Don’t forget to plug spa jets, fountain returns, and any other water features that connect to your plumbing system.
Install and Secure Your Winter Pool Cover
Your pool cover is the final barrier against debris, algae, and freeze damage during winter months. After years of dealing with spring cleanup nightmares, I’ve learned that proper cover installation makes the difference between opening a pristine pool and facing a swamp.
Choose Between Safety Cover or Winter Tarp Cover
Safety covers cost more upfront but they’re worth every penny for families with kids or pets. These mesh or solid vinyl covers stretch tight across your pool and anchor into deck hardware, supporting up to 400 pounds. Winter tarp covers work fine for debris protection but they’ll sag with snow and can’t support weight safely.
Ensure Complete Coverage With No Gaps or Sagging
Your cover must extend 3-4 feet beyond the pool’s edge on all sides to prevent wind from getting underneath. Check for tears or weak spots before installation – even small holes become major problems during winter storms. Smooth out all wrinkles and ensure the cover lies flat against the water surface.
Secure Cover With Water Bags, Clips, or Anchors
Water bags work best for tarp covers – fill them 90% full and space them every 3-4 feet around the perimeter. Safety covers use spring-loaded anchors that screw into your deck permanently. Cable and winch systems provide the tightest seal but require more setup time and mechanical knowledge to install properly.
Conclusion
Following this 7-step winterization process will save you from costly repairs and frustrating spring cleanups. You’ll protect your equipment from freeze damage while ensuring crystal-clear water when swimming season returns.
Remember that proper pool closing isn’t just about convenience—it’s about protecting your investment. Each step builds on the previous one to create a comprehensive defense against winter’s harsh conditions.
Take your time with each phase and don’t skip steps to save time. Your future self will thank you when you’re swimming in pristine water next summer instead of dealing with green algae or broken equipment.
Frequently Asked Questions
What are the most common mistakes when winterizing a pool?
The most common mistakes include improper chemical balancing, failing to thoroughly clean the pool before closing, and not protecting equipment from freezing water. First-time pool owners often skip crucial steps like shocking the pool water, draining plumbing lines, or installing proper winter covers, which can lead to expensive equipment damage and water quality issues come spring.
When should I start winterizing my pool?
Begin winterizing your pool when daytime temperatures consistently stay below 65°F. Starting too early while temperatures are still warm can promote algae growth, while waiting too long risks freeze damage to equipment and plumbing. Most pool owners should plan to winterize between late September and early November, depending on their climate.
How do I properly balance pool water chemistry before winter?
Test and adjust your pool water to achieve pH levels between 7.2-7.6, total alkalinity between 80-120 ppm, and calcium hardness between 150-300 ppm. Use muriatic acid to lower pH, sodium bicarbonate to raise alkalinity, and calcium chloride to increase hardness. Proper chemical balance prevents algae growth and protects pool surfaces during winter months.
How much should I lower my pool water level for winter?
Lower your pool water level 4-6 inches below the skimmer opening and return jets for in-ground pools, or 1-2 inches below the skimmer for above-ground pools. This prevents ice expansion from cracking fittings while maintaining enough water for structural stability. Never completely drain your pool unless absolutely necessary, as this can cause structural damage.
What winterizing chemicals do I need to add?
Add copper or polyquat-based algaecide at 2-4 times the normal summer dose, pool antifreeze for plumbing lines (1 gallon per skimmer line), and enzyme-based cleaners to break down organic debris. Wait 24 hours after shocking for chlorine levels to drop below 3 ppm before adding these chemicals to prevent conflicts that reduce their effectiveness.
How do I protect my pool equipment from freezing?
Drain all water from your pool pump, filter, heater, and plumbing lines by removing drain plugs. Use a shop vacuum or air compressor to blow out remaining water from all lines. Install expansion-type pool plugs in all openings including skimmer returns, main drain lines, and water features to create watertight seals and prevent freeze damage.
What type of winter pool cover should I use?
Choose between safety covers (more expensive but better protection) or winter tarp covers (adequate for debris protection but may sag). Ensure your cover extends 3-4 feet beyond the pool’s edge with no gaps, tears, or sagging. Secure it properly with water bags, clips, or anchors to create a tight seal and prevent winter-related issues.