7 Tips for Customizing Your Life Jacket That Maximize Safety
Transform your life jacket into a personalized safety command center with custom storage, visibility upgrades, ID patches, and emergency signaling devices for water adventures.
Your life jacket doesn’t have to look like everyone else’s boring orange vest. Whether you’re kayaking whitewater rapids or cruising calm lakes you can transform your personal flotation device into something that reflects your personality while maintaining its life-saving function. Smart customization choices will make you more visible on the water and help you feel confident during every aquatic adventure.
Disclosure: As an Amazon Associate, this site earns from qualifying purchases. Thank you!
Choose the Right Base Life Jacket for Your Needs
This clear storage bag contains four US Coast Guard-approved adult life jackets for convenient storage and boating safety. The Type II vests fit adults 90+ lbs with adjustable straps and provide essential flotation.

Your customization journey starts with selecting the right foundation jacket. Without the proper base, even the best customizations won’t deliver the safety and comfort you need on the water.
Consider Your Water Activity Type
Whitewater kayaking demands high-mobility vests with minimal bulk around your torso and arms. These short-cut designs let you paddle aggressively through rapids without fabric bunching.
Lake fishing calls for maximum storage capacity with multiple pockets for tackle boxes and gear. The extra bulk won’t interfere with your casting since you’re not performing dynamic movements.
Select Appropriate Buoyancy Rating
Type III jackets provide 15.5+ pounds of buoyancy for most recreational activities like kayaking and paddleboarding. This rating keeps conscious adults afloat in calm to moderate conditions.
Type I jackets deliver 22+ pounds of buoyancy for offshore boating where rescue might take hours. They’ll turn unconscious wearers face-up, making them essential for deep water adventures.
Ensure Proper Fit and Sizing
Your jacket should feel snug without restricting breathing when all straps are properly adjusted. A loose jacket rides up dangerously when you hit the water, potentially slipping over your head.
Test the fit by having someone lift you by the shoulders while wearing the jacket. If it slides up past your chin, size down immediately for your safety.
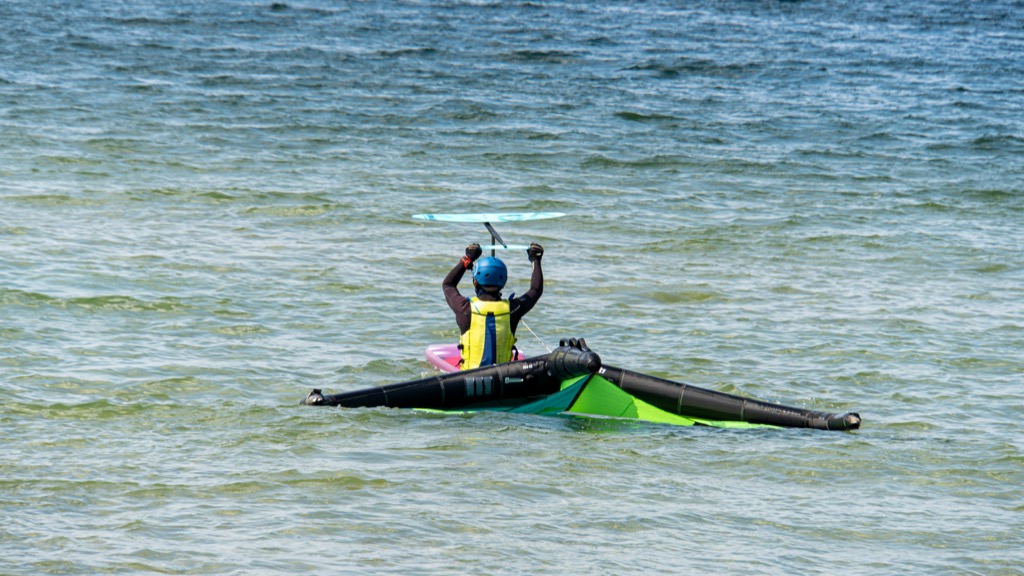
Add Reflective Tape and Visibility Enhancements
Enhance safety with this high-visibility red and white reflective tape. Its strong adhesive ensures secure application to various surfaces, while the durable, weather-resistant design provides long-lasting conspicuity.

Visibility can mean the difference between a quick rescue and a prolonged search when you’re in the water after dark or in low-light conditions. Your customized life jacket becomes a beacon that helps others spot you from significant distances.
Apply Marine-Grade Reflective Strips
Marine-grade reflective tape outperforms standard automotive versions by maintaining adhesion in saltwater and UV exposure. Apply 2-inch strips along your jacket’s shoulders and chest panels where they’ll catch searchlights most effectively. Position additional strips on your back to ensure 360-degree visibility when floating face-up.
Install LED Light Attachments
Waterproof LED strips or clip-on lights transform your jacket into a floating lighthouse during dawn, dusk, or emergency situations. Choose lights with multiple flash patterns and 8+ hour battery life for extended water activities. Mount primary lights on shoulder straps and backup lights near your whistle attachment point for easy access.
Choose High-Visibility Color Accents
Neon green and bright yellow accents stand out better than traditional orange in many water conditions, especially against blue-green lake backgrounds. Add colored webbing to adjustment straps or replace standard buckles with high-vis alternatives. Avoid red accents since they disappear first underwater and blend with sunset lighting conditions.
Install Custom Pockets and Storage Solutions
Adding functional storage transforms your life jacket from basic safety gear into a complete water activity command center. You’ll keep essential items secure and accessible while maintaining full mobility.
Add Waterproof Zippered Pockets
Waterproof zippered pockets give you secure storage for phones, keys, and emergency supplies without compromising buoyancy. Install marine-grade zippers with rubber gaskets on the chest or waist areas for easy access. Position pockets away from buckle systems to prevent interference during emergency removal.
Attach Tool Loops and D-Rings
Tool loops and D-rings create attachment points for knives, whistles, and safety equipment that you need instant access to. Install stainless steel D-rings using heavy-duty thread and backing material to handle the stress of moving water. Space multiple attachment points across the vest to distribute weight evenly.
Create Specialized Equipment Holders
Specialized equipment holders accommodate activity-specific gear like fishing pliers, rescue throw bags, or communication devices. Design custom holders using neoprene sleeves or Velcro straps that match your equipment’s dimensions. Test all holders in shallow water before heading out to ensure they’ll retain gear during unexpected immersion.
Personalize with Patches and Identification
Making your life jacket uniquely yours starts with proper identification. Smart customization transforms your PFD into a personalized safety tool that’s instantly recognizable on the water.
Apply Name Tags and Contact Information
Identify and organize with these 400 colorful name tags. The peel-and-stick design is easy to use on clothes and surfaces without leaving residue.

Waterproof name tags aren’t just for kids’ camp gear – they’re essential for adult water safety. Marine-grade vinyl labels withstand saltwater exposure and UV rays better than standard tags.
Place your name and emergency contact on the jacket’s chest panel where it’s visible to rescuers. This simple addition helps first responders identify you quickly during emergencies.
Add Custom Embroidered Patches
Customize your clothes with this set of 72 assorted iron-on embroidered patches. Easily apply these durable appliques to clothing, bags, and more with an iron or by sewing.

Embroidered patches add personality while maintaining professional durability. Marine thread resists fading and fraying even after seasons of saltwater exposure.
Choose patches that reflect your water activities – kayaking clubs, fishing tournaments, or maritime organizations. Position them on shoulder panels or back sections where they won’t interfere with buckles or zippers.
Include Emergency Medical Information
Medical alert patches can save your life when you can’t speak for yourself. Waterproof medical ID tags attach securely to D-rings or chest panels.
Include critical information like allergies, medications, and emergency conditions. Consider using QR codes that link to detailed medical profiles – they’re scannable even when wet.
Upgrade Buckles and Adjustment Systems
Standard life jacket hardware works fine until you’re trying to get out of rough water quickly or adjust your fit on the fly.
Replace Standard Buckles with Quick-Release Options
Quick-release buckles transform emergency situations. Marine-grade side-release buckles let you escape your jacket in seconds if it snags underwater. Look for stainless steel or heavy-duty plastic options rated for 500+ pounds of force to ensure they won’t fail when you need them most.
Add Adjustable Straps for Better Fit
Custom strapping systems eliminate the gap between standard sizes. Add adjustable side straps with marine-grade webbing to fine-tune your jacket’s fit around your torso. Chest straps with quick-adjust sliders help you accommodate different clothing layers throughout the season without compromising buoyancy placement.
Install Comfort Padding at Pressure Points
Strategic padding prevents chafing during long water sessions. Marine-grade foam padding at shoulder contact points and under-arm areas eliminates hot spots that develop during extended wear. Closed-cell foam maintains its cushioning even when wet and won’t absorb water that adds unnecessary weight.
Incorporate Whistle and Safety Signal Devices
Your enhanced life jacket becomes a complete safety system when you add signaling devices that can save your life in emergency situations.
Attach High-Decibel Emergency Whistles

Marine whistles produce 120+ decibels and cut through wind and wave noise better than your voice ever could. Attach a pealess whistle to your chest strap using a retractable lanyard that won’t tangle during activities. Choose stainless steel or high-impact plastic models that won’t corrode in saltwater environments.
Mount Signal Mirrors and Flares
Signal for help over long distances with this durable acrylic survival mirror. Featuring a built-in aiming system for accurate and fast signal transmission, it's a crucial tool for outdoor adventures.
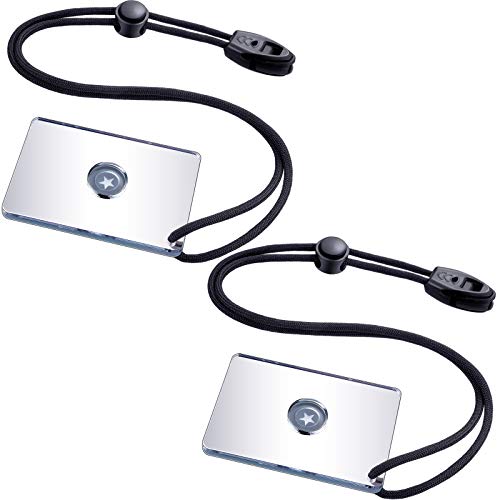
Signal mirrors reflect sunlight up to 10 miles and work when electronic devices fail. Mount a 2×3 inch unbreakable mirror in a chest pocket alongside waterproof flares. Position both items where you can access them quickly with one hand while maintaining your grip on safety equipment.
Add Personal Locator Beacon Attachments
PLBs transmit your exact GPS coordinates to rescue services within minutes of activation. Create a dedicated attachment point using marine-grade D-rings sewn into your life jacket’s shoulder area. Ensure your beacon remains secure but accessible and register it with appropriate authorities before heading out on the water.
Weatherproof and Maintain Your Customizations
Your customized life jacket needs proper protection and maintenance to remain safe and functional season after season. The marine environment’s salt spray, UV rays, and constant moisture can quickly degrade even quality modifications.
Apply Protective Coatings to Added Components
Marine-grade UV protectant spray shields your custom patches and reflective tape from sun damage. Apply this coating every three months to prevent fading and cracking.
Waterproof sealant around attachment points prevents water infiltration that can weaken connections. Focus on areas where you’ve added D-rings, light mounts, or custom pockets.
Regular Inspection of Custom Modifications
Check all custom attachments before each water outing for loose threads, corrosion, or wear patterns. Pay special attention to stress points where modifications connect to the jacket’s original fabric.
Test electronic components like LED lights and PLB devices monthly to ensure they’re functioning properly. Replace batteries according to manufacturer specifications rather than waiting for failure.
Proper Storage and Care Techniques
Store your customized life jacket in a cool, dry location away from direct sunlight and chemicals. Avoid folding custom patches or reflective elements that can develop permanent creases.
Rinse thoroughly with fresh water after each saltwater use to remove corrosive salt deposits. Allow complete air drying before storage to prevent mold growth in custom pockets and padding areas.
Conclusion
Your customized life jacket becomes more than just safety equipment—it transforms into a personalized piece of gear that reflects your style while keeping you protected on the water. These modifications ensure you’ll feel confident and comfortable during every aquatic adventure.
Remember that functionality should always come first when making these customizations. Every addition needs to maintain your jacket’s buoyancy and safety ratings while enhancing your overall water experience.
Take your time implementing these changes and test each modification thoroughly before heading out. Your customized life jacket will serve you well for years to come when properly maintained and cared for.
Frequently Asked Questions
Can I customize my life jacket while maintaining its safety features?
Yes, you can personalize your life jacket with various modifications while preserving its safety functionality. Focus on adding reflective tape, LED lights, custom patches, and storage solutions that don’t compromise the jacket’s buoyancy or structural integrity. Always ensure modifications don’t interfere with the jacket’s ability to keep you afloat and visible in emergencies.
What type of life jacket should I choose for different water activities?
Select your base jacket according to your specific activity. For whitewater kayaking, choose high-mobility Type III vests. For lake fishing, opt for jackets with storage capabilities. For offshore boating, Type I jackets provide maximum buoyancy. Always ensure proper fit and appropriate buoyancy rating for your intended water conditions.
How can I improve my life jacket’s visibility in low-light conditions?
Enhance visibility by adding marine-grade reflective tape, which outperforms standard versions. Install waterproof LED light attachments at strategic points to create a beacon effect. Incorporate high-visibility color accents like neon green or bright yellow. Avoid red accents as they can blend into water environments during emergencies.
What storage solutions can I add to my life jacket?
Install waterproof zippered pockets for essentials like phones and keys, ensuring they don’t affect buoyancy. Add tool loops and D-rings for safety equipment access. Create specialized equipment holders for activity-specific gear. These modifications should maintain full mobility while keeping necessary items secure and easily accessible during water activities.
How should I add identification and patches to my life jacket?
Use waterproof name tags with your name and emergency contacts, placed visibly for rescuers. Add custom embroidered patches for personality while ensuring durability and proper placement. Include waterproof medical ID tags with essential health information, potentially featuring QR codes linking to detailed medical profiles for emergency situations.
What buckle and adjustment upgrades should I consider?
Replace standard buckles with marine-grade quick-release options rated for high force to enable rapid escape in emergencies. Install adjustable straps for better torso fit and accommodation of different clothing layers. Add comfort padding at pressure points using marine-grade foam that maintains cushioning when wet to prevent chafing during extended wear.
What signaling devices can I attach to my life jacket?
Attach high-decibel emergency whistles producing over 120 decibels to cut through wind and wave noise. Mount signal mirrors and waterproof flares for emergency signaling. Consider adding personal locator beacon attachments that transmit GPS coordinates to rescue services, transforming your jacket into a comprehensive safety communication system.
How do I maintain and weatherproof my customized life jacket?
Apply marine-grade UV protectant spray to shield patches and reflective tape from sun damage. Use waterproof sealant around attachment points to prevent water infiltration. Conduct regular inspections of modifications, especially electronic components. Rinse after saltwater use and store in cool, dry places to prolong customization lifespan.