7 Seasonal Pool Opening Techniques For Enthusiasts That Pros Swear By
Discover 7 expert pool opening techniques for enthusiasts – from properly removing winter covers to balancing chemicals and establishing an effective maintenance schedule for a pristine swimming season.
The warm weather’s return signals it’s time to uncover your pool and prepare for months of swimming enjoyment. As a pool owner, mastering the art of seasonal opening ensures crystal-clear water and minimizes maintenance headaches throughout the summer season.
In this guide, you’ll discover seven expert techniques that go beyond basic pool opening steps, helping you achieve professional-quality results without calling in expensive services. From properly removing and storing winter covers to achieving perfect chemical balance from day one, these methods will transform your annual pool opening routine.
Disclosure: As an Amazon Associate, this site earns from qualifying purchases. Thank you!
How to Prepare Your Pool Area Before Opening Day
- Clear debris from the deck and surrounding area first to prevent it from blowing into your freshly cleaned pool. Sweep thoroughly, power wash the deck if needed, and remove any leaves, twigs, or winter grime that accumulated around the perimeter.
- Inspect and repair pool equipment including your pump, filter, heater, and automated systems. Check for cracks, leaks, or damage that might have occurred during winter months, and replace worn-out O-rings or gaskets before they cause bigger problems.
- Clean and organize your pool supplies by discarding expired chemicals, sanitizing skimmers and nets, and arranging your testing kits for easy access. Creating a dedicated storage system will make your regular maintenance much more efficient throughout the swimming season.
- Trim back overhanging branches and landscaping that could drop debris into your pool. Creating a clear 3-5 foot zone around your pool will significantly reduce cleaning time and prevent clogged filters once you’re up and running.
- Check for safety concerns by testing gate latches, inspecting fencing for gaps, and ensuring all required safety equipment is in good condition. This critical step protects both children and pets while keeping you compliant with local regulations.
Removing and Cleaning Winter Pool Covers Properly
Draining Accumulated Water Without Damaging the Cover
Start by removing debris from the pool cover surface using a leaf rake or skimmer net. Position your submersible pump at the center of the cover where water has collected, ensuring the discharge hose directs water away from the pool area. For solid covers, use a cover pump with automatic shut-off to prevent the pump from running dry and becoming damaged. With mesh covers, slowly remove the water retention bags or weights before carefully lifting the cover.
Cleaning and Storing Covers to Extend Their Lifespan
Spread your pool cover on a clean, flat surface like your driveway and scrub with a soft brush using a mild detergent solution. Rinse thoroughly with a garden hose until all soap residue is removed. Allow the cover to dry completely before folding to prevent mildew growth. Store your clean, dry cover in a sealed container or specialized storage bag in a cool, dry location away from direct sunlight and rodents. Properly stored covers can last 3-5 years longer than neglected ones.
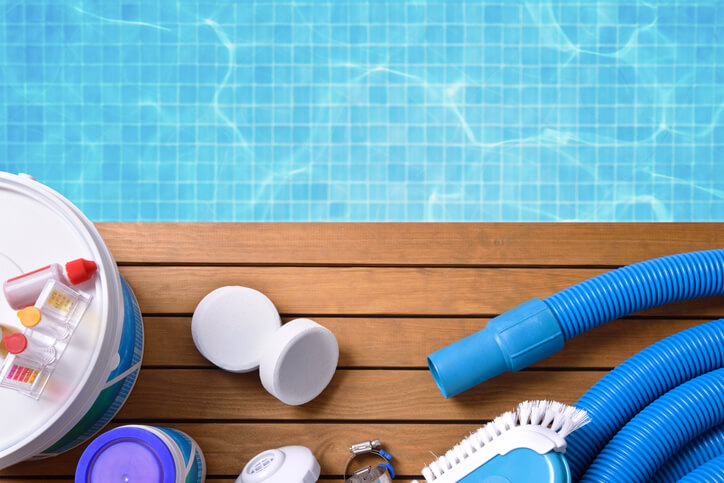
Testing and Balancing Your Pool Water Chemistry
Essential Chemical Measurements for a Successful Opening
Proper chemical testing forms the foundation of a successful pool opening. Test for free chlorine (2-4 ppm), pH (7.2-7.6), alkalinity (80-120 ppm), calcium hardness (200-400 ppm), and cyanuric acid (30-50 ppm). Use fresh testing strips or digital testers for accuracy, as chemicals degrade during winter storage. Record your baseline readings to track changes throughout the opening process.
Addressing Common Chemical Imbalances After Winter
Winter stagnation typically creates three major imbalances: low sanitizer levels, pH drift, and high metal content. Add chlorine shock first to eliminate contaminants, waiting 24 hours before other adjustments. Next, correct pH using acid or soda ash depending on your readings. Finally, add a metal sequestrant if you notice staining or discoloration to prevent metals from settling into your pool surface.
Inspecting and Servicing Pool Equipment Systems
Pump and Filter Maintenance Essentials
Your pool pump and filter system requires thorough inspection before summer use. Remove the pump basket and clear any debris or leaves that accumulated during winter. Check for cracks in the housing and inspect O-rings for wear, replacing them if they show signs of deterioration. Clean filter cartridges with a specialized cleaner or replace DE grids if necessary. Test the pump by running it briefly, listening for unusual noises that might indicate bearing failure.
Checking Heaters and Automation Systems for Optimal Performance
Pool heaters need special attention after winter dormancy. Inspect gas heaters for pest nests in ventilation systems and clear away any debris. Check electrical connections for corrosion and ensure safety switches operate correctly. For automation systems, verify that timer functions work properly and test each programmed setting. Replace batteries in remote controls and verify that temperature sensors provide accurate readings before the swimming season begins.
Cleaning and Treating Pool Surfaces for the New Season
Removing Stains and Algae Growth Effectively
Start your pool surface treatment by tackling stains and algae first. Apply a stain remover specifically designed for your pool type (vinyl, concrete, or fiberglass) to target discoloration spots. For stubborn algae, use an algaecide formulated for the specific type of growth—black, green, or yellow—and let it circulate for 24 hours before brushing. Always treat the entire pool surface, not just visible problem areas, to prevent quick regrowth.
Brushing Techniques for Different Pool Surfaces
Your brushing approach should vary based on pool surface material. For concrete or plaster pools, use stiff nylon or wire brushes to scrub away debris and biofilm effectively. Vinyl and fiberglass surfaces require softer brushes to prevent scratches while still removing contaminants. Always brush in overlapping strokes from shallow to deep areas, pushing debris toward the main drain. For corners and steps, use smaller detail brushes to reach tight spaces where algae commonly develops.
Optimizing Water Circulation After Winter Dormancy
Proper water circulation is essential after your pool has been dormant all winter. Re-establishing effective flow helps distribute chemicals evenly and prevents algae growth as you begin the new swimming season.
Strategic Use of Return Jets for Maximum Efficiency
Position your return jets at a 45-degree angle to create a circular flow pattern around your pool. This directional adjustment prevents dead zones where debris and algae can accumulate. Aim some jets toward the surface to improve skimmer effectiveness, while pointing others downward to circulate water at deeper levels. For irregular-shaped pools, experiment with different jet configurations until you achieve complete water movement throughout all areas.
Cleaning and Priming the Pump System
Remove all drain plugs you installed for winterization and inspect the pump basket for cracks or damage. Clean the basket thoroughly, removing any debris that accumulated during the off-season. Apply a silicone-based lubricant to the pump lid O-ring to prevent air leaks that could reduce circulation efficiency. Before starting the system, prime the pump by filling it with water until it overflows, which prevents damaging dry starts and ensures immediate water flow when powered on.
Backwashing and Rinsing the Filter
Set your filter system to “backwash” and run it for 2-3 minutes until the water in the sight glass appears clear. This reverses the normal flow direction, flushing out accumulated contaminants from winter dormancy. After backwashing, switch to the “rinse” setting for 1 minute to settle the filter media and clear the lines of any remaining debris. For cartridge filters, remove and clean each element thoroughly with a dedicated filter cleaner solution rather than backwashing.
Addressing Air in the System
Persistent bubbles in your return jets indicate trapped air that’s hampering circulation efficiency. Bleed air from your filter system using the air relief valve until a steady stream of water appears. Check all pipe connections and pump lid for proper sealing if air continues to enter the system. In above-ground pools, inspect the skimmer and return fitting gaskets, as these are common entry points for air that can significantly reduce your pump’s circulation capacity.
Setting Optimal Run Times for Spring Conditions
Run your pump system for 10-12 hours daily during the first two weeks after opening to ensure thorough circulation and chemical distribution. Schedule operation during the warmest parts of the day (typically 10 AM to 6 PM) when algae growth is most likely to occur. For variable-speed pumps, begin with higher RPM settings initially, then gradually reduce to energy-efficient lower speeds once water clarity is established and maintained.
Establishing a Maintenance Schedule for the Swimming Season
Creating Customized Routines Based on Pool Type and Usage
Different pool types demand specific maintenance approaches. Vinyl pools require gentle cleaning products and weekly liner inspections, while concrete pools need more frequent brushing to prevent algae buildup. High-usage pools serving large families or frequent gatherings should have chemicals tested 2-3 times weekly, compared to once-weekly for less busy pools. Customize your maintenance schedule based on factors like tree coverage, local climate conditions, and the number of swimmers to ensure optimal water quality throughout the season.
Weekly Maintenance Tasks to Prevent Problems
Perform skimming and debris removal daily to prevent circulation system clogs and maintain water clarity. Test and adjust chemical levels twice weekly, focusing on chlorine (1-3 ppm) and pH (7.2-7.6) during heavy use periods. Brush pool walls and floor weekly using overlapping strokes to dislodge biofilm before it becomes visible algae. Vacuum the entire pool surface at least once weekly, and empty skimmer and pump baskets to ensure proper water flow. Remember that consistent weekly maintenance prevents 90% of common pool problems that require expensive treatments later.
Monthly Deep Cleaning and System Checks
Inspect and clean your filter system monthly according to manufacturer guidelines—backwashing sand filters, rinsing cartridge filters, or cleaning DE grids as needed. Check heater connections and clean heat exchangers to maintain energy efficiency and extend equipment life. Test calcium hardness and cyanuric acid levels, adjusting as needed to prevent scaling or reduced chlorine effectiveness. Examine pool surfaces for developing stains or rough spots that might indicate chemical imbalances, and inspect equipment gaskets and o-rings for leaks or wear that could compromise system performance.
Seasonal Adjustments for Changing Weather Conditions
Increase chlorine levels by 0.5-1.0 ppm during heat waves when temperatures exceed 90°F to combat accelerated chlorine degradation. After heavy rainstorms, test and rebalance water chemistry immediately, focusing on pH and alkalinity that rainfall typically disrupts. During pollen season (typically late spring), clean your filter more frequently and run your pump 1-2 hours longer daily to capture airborne debris. As temperatures fluctuate between seasons, adjust your pump’s runtime—10-12 hours daily during peak summer heat versus 6-8 hours during cooler spring and fall months for optimal energy efficiency while maintaining water quality.
Record-Keeping Systems for Pool Maintenance
Create a digital or physical log documenting all chemical readings, maintenance activities, and product additions with specific dates and amounts. Take timestamped photos of notable conditions or problems to track resolution progress and identify recurring issues. Use automatic reminders or a pool maintenance app to schedule routine tasks and chemical testing at consistent intervals. Maintain equipment warranty information, service records, and chemical purchase receipts in your maintenance file to track product effectiveness and troubleshoot problems. Consistent record-keeping helps identify patterns, optimize chemical usage (saving 15-25% annually), and prevent costly maintenance oversights.
Troubleshooting Common Pool Opening Problems
Armed with these seven seasonal pool opening techniques you’re now ready to transform your pool from winter dormancy to summer enjoyment. Remember that patience and attention to detail make all the difference when preparing your aquatic retreat.
By following these expert methods you’ll not only save time and money but also extend the life of your pool equipment and surfaces. Your diligence during the opening process directly impacts water quality and maintenance requirements throughout the swimming season.
Don’t hesitate to consult professionals for complex issues beyond DIY solutions. With proper planning and these proven techniques your pool will be the centerpiece of countless summer memories. Get ready to dive in and enjoy crystal-clear waters all season long!
Frequently Asked Questions
When is the best time to open my pool for the summer?
The ideal time to open your pool is when temperatures consistently stay above 70°F. In most regions, this means mid-spring (April-May), giving you enough time to address any issues before peak swimming season. Opening too early may waste chemicals, while waiting too long can lead to more severe algae growth and cleaning challenges.
How do I properly remove a winter pool cover?
Remove debris from the cover first using a pool cover pump for standing water. For solid covers, carefully fold from one end to the other, avoiding dragging on rough surfaces. For mesh covers, rinse with a garden hose before storing. Always clean and completely dry covers before storage in a cool, dry place protected from pests.
What chemicals do I need to balance my pool water after winter?
Start with testing pH (7.2-7.6), alkalinity (80-120 ppm), and chlorine levels (1-3 ppm). You’ll likely need chlorine shock, pH increaser/decreaser, alkalinity adjuster, calcium hardness increaser, and algaecide. Balance chemicals in this order: alkalinity first, pH second, then chlorine and other treatments, waiting 8-12 hours between adjustments.
How do I prepare my pool equipment for the swimming season?
Inspect your pump, motor, and filter for cracks or wear. Clean or replace filter media following manufacturer guidelines. Check gaskets and O-rings, replacing any that show damage. Lubricate O-rings with pool lubricant. Examine heaters for debris and pest nests. Test the system’s pressure once running to ensure proper operation.
What should I do if my pool has algae when I open it?
For light algae, brush all pool surfaces thoroughly and add a double dose of chlorine shock with algaecide. For severe algae, use a copper-based or quaternary algaecide, maintain 24-hour filtration, and continue brushing daily. Test and maintain proper chlorine levels (3-5 ppm) until water clears, then vacuum any dead algae.
How often should I run my pool pump after opening?
Run your pump 8-12 hours daily during the opening process and early season. Proper circulation is crucial for distributing chemicals and preventing algae. As temperatures increase, you may need to extend run time. Use a timer to split operation into multiple periods throughout the day for optimal efficiency.
What weekly maintenance is required after opening my pool?
Test water chemistry 2-3 times weekly, adjusting as needed. Skim surface debris daily. Empty skimmer and pump baskets. Brush walls and floor weekly. Vacuum the pool at least weekly. Check and clean filter pressure as indicated. Maintain water level at mid-skimmer height. Shock the pool weekly during heavy use periods.
How do I remove stains from my pool surface during opening?
For organic stains (leaves, algae), use chlorine shock and brushing. For metal stains (rust, copper), use a vitamin C tablet or commercial metal remover. Apply directly to the stain, then brush. For stubborn stains on plaster pools, use a pumice stone with gentle pressure. Always identify the stain type before treatment.
When should I call a professional pool service instead of DIY opening?
Consider professional help if you notice structural damage, major equipment failures, persistent water balance issues, severe staining, or if your pool has special features like automation systems. Also consider professionals if you lack time, physical ability, or if you’ve had unsuccessful DIY attempts in previous seasons.
How can I reduce chemical usage when opening my pool?
Use a quality pool cover during off-season to minimize debris and algae. Clean thoroughly before adding chemicals. Test water accurately before adding any products. Use a pool enzyme product to break down organic contaminants. Consider a mineral system to reduce chlorine needs. Maintain proper circulation to maximize chemical efficiency.